When crafting as a hobby, there are a ton of opportunities to make
things—things that make you smile, things that make others smile, and more or
less useful things.
Along with all those
wonderful things, there are plenty more opportunities for road
blocks, which can strike fear in the hearts of otherwise intrepid crafters, and
may keep some from pursuing and achieving awesomeness. Such include new and scary-looking equipment,
new and difficult techniques, mess-ups (whether or not they’ve actually
happened), and the list goes on.
 |
| This has happened to me more times than I care to count. |
That’s why I’ve decided to start a series of common
crafters’ fears, starting with the crafts with which I’m most familiar—that is,
knitting and crochet—and go over what the fear is, why it exists, and ways to
face it to get the most awesome project ever!
 |
| Yes, even you can learn this! But that's another post. |
Before I start, though, I will advise you to seek out the
folks at your nearest local yarn shops for specific troubleshooting. If there is a specific issue in your current
project, they will be able to pick up your work, examine it, and diagnose. This is also important: these instructions are written for a
right-handed knitter; if you’re a lefty, I again suggest going to your local
yarn shop. You’ll see I also knit
continental, but that shouldn’t affect the instructions.
And with that, here we go!
For my inaugural edition I would like to start with a fear
that’s relatively common for new crafters, but one that’s relatively easy once
you’ve gotten a confidence boost. This,
my friends, is lace. And lace
charts.
I really hate to dumb it down, but I say you should talk
your troubles down to a level that you can manage.
Knitting patterns and designs into fabric, as you do in lace, is really
just combining different stitch types and arranging them stitch by stitch and row by row.
Aside from the basic knit stitch, there are a few other
stitches and techniques that you’ll need to get under your belt as a
knitter:
Purl stitch
Yarn-over
Slipping stitches
Twisting stitches
Decreases
With that, let’s tackle these one-by-one.
Purling
As a knitter, I’m not just going to assume you already know
how to do this one, or any of the other techniques. However, I will say that if you do, you can
skip this one, but looking at the photos won’t hurt things.
Here we go. First, make sure your yarn is at the front of
your work instead of behind. Then take
your needles and put the right needle into the next stitch (in the left hand)
going from the top down, like a diver going head-first into a pool. Make sure your needles cross over each other,
with the needle in your right hand on top.

Next, wrap your yarn up the front, over, and down the back
of the needle in your right hand. This
is also called a “yarn over”, which we will discuss next.
 |
| Up the front of the needle... |
 |
| ...And down the back. |
The rest is similar to the knit stitch, where you bring the
needle and your yarn through the working stitch on the left needle then
release.


Yarn Overs
Twisting Stitches


What this stitch ultimately does is puts the little bump on
the side of the fabric facing you, and the little “v” shape on the side away
from you. For ribbing, alternate this
with the knit stitch in the same row, or you can make a chart to create little
pictures and texture patterns in your fabric!
Yarn Overs
The yarn-over is the simplest increase out there, and it
creates an intentional hole in the fabric.
This one is key to lacework--you simply cannot have knit lace without it. All you do is wrap your yarn around your working
needle from front to back and that’s your stitch.
 |
| It's just like with your other stitches--up the front, over the needle, and down the back. |
This stitch also adds another stitch to your needles, so unless you’re intending to increase and make the row and the rest of your project one stitch wider, you’ll need to take away some
other stitches to make up for it. We'll get into that one in a little bit.
Slipping Stitches
This one is also very easy, but there are a couple ways of
going about it, depending on the desired effect in the fabric. Slipping a stitch knit-wise is like the
beginning of a knit stitch, except instead of wrapping the yarn around your
needle and creating a new stitch, you simply move the existing stitch from left
to right. Slipping purl-wise works on
the same principle, except placing your needle in the stitch from the top down
instead of from the bottom up.
Twisting Stitches
When you twist a stitch, you have to think backwards a
little. Let’s take this one part at a
time…
Twisting a knit stitch, a.k.a. Knitting through the back of
the loop (common abbrev: KTBL), involves
inserting the needle in the back of the work from the top down (like our diver
analogy), but making sure the yarn is back behind your needles.


Then work your stitch as normal: yarn over, put the needle and the new stitch
through, and release the old stitch.
To twist a purl stitch (a.k.a. purling through back of the
loop, abbrev. PTBL), make sure the yarn is at the front of the work, then insert
the stitch upward through the stitch, coming from behind. Then work your stitch as normal. The picture will be a little wonky, but hopefully it will work.

Decreases

Decreases
As I said before, when you yarn-over in lacework and you
want to keep the number of stitches on your needles the same, you need to learn
to decrease. This involves combining two
or more stitches into one. The basic
decreases go like so: insert your needle
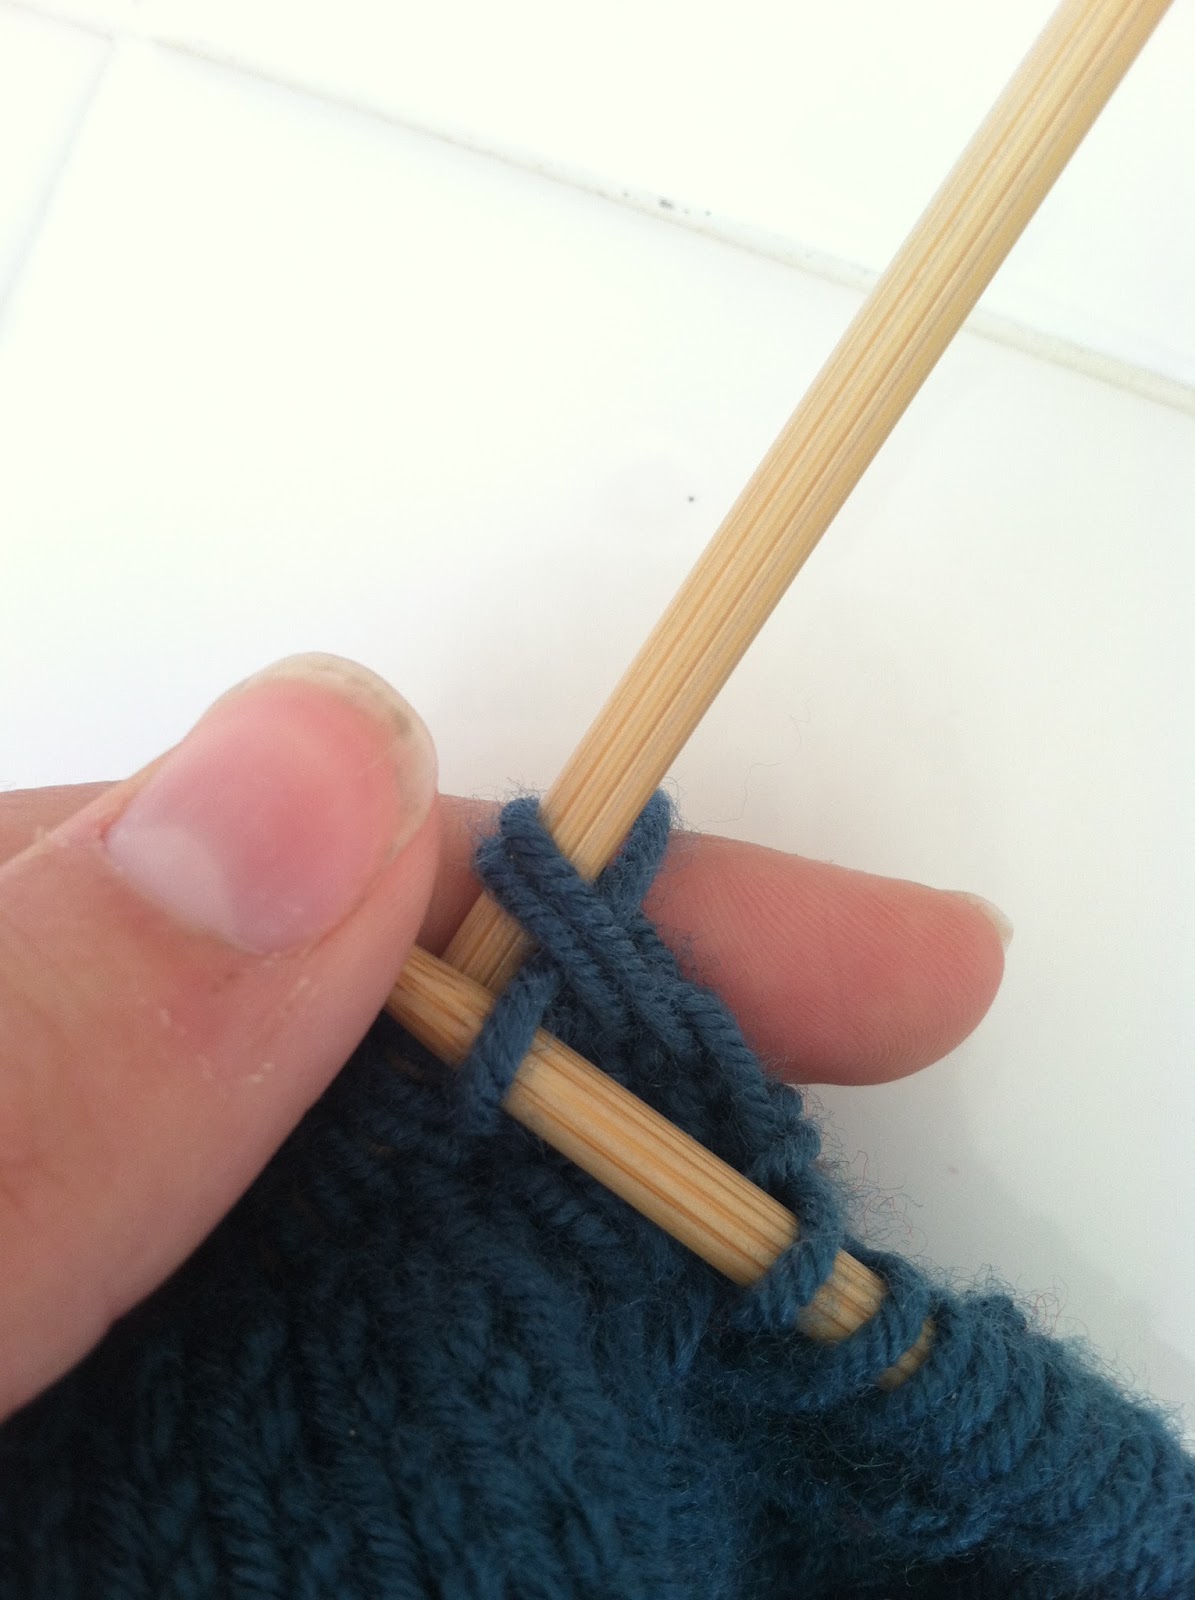
into two (or three, or more) as if to purl or knit…
 |
| For the sake of demonstration, I'm doing the classic knit two together, or K2tog. |
…and work the stitches as one big stitch.


Reading Charts
I hope this cleared up some of the mystery of laces and
charts! Next time on Fear Factor: Crafter’s edition, I’ll demystify the art of…
Until then, see ya!
 |
With the knit stitch, that causes the decrease to lean to
the right (looks like a forward slash / )
Another decrease is the slip-slip-knit (ssk).
Slip one stitch knit-wise, then another, and
knit the two stitches together (it should look like you’re working a KTBL on
this step, but it produces different results).

The stitch should look like
a backslash ( \ ) when the rest of the row is complete. Another way to produce the same result is to slip
a stitch knit-wise, knit the next stitch, then pass the slipped stitch over
(abbrev sl, k, psso).
Reading Charts
Now that you finally have the basics of what stitches and stitch types are commonly used in lace knitting, it's time to look at another form of instruction.
As intimidating as they look, charts are a knitter’s—and a
pattern writer’s best friend. They
condense a pattern and make it easier to write, and they give visual learners
something to go on. But you need to know
how to read a chart if you want it to work with you.
When looking at most lace (and other) charts, the chart is
going to depict where each stitch is placed in the finished fabric. That being said, since it shows only the
right side of the fabric, you need to think backwards a little when you work
the rows where the wrong side of the fabric is facing you.
In the picture below, the first chart is how
most patterns depict their charts, complete with row numbers and key to
symbols. (For any experienced knitters,
feel free to test this pattern. I didn’t
want to copy someone else’s design, so I made something up off the top of my
head.)
 |
| For your convenience, all the techniques I covered, and nothing too foreign. |
The same chart is copied on the bottom, but this time I put
little red arrows that wind their way through the rows; this is how you would
read a chart pattern, from right to left on the right side rows, then left to
right on a wrong-side row.
 |
| Don't get dizzy... |
CABLES! (cue dramatic
chord of music)
I’ve got a sort of mental list of topics that I hope to
cover, but if there’s something you are just itching to know or really want me
to do a post about, please message me in the comments below!
Until then, see ya!
 |
| "You woke me up for this?" |
No comments:
Post a Comment